Introduction#
In this post, I’ll briefly discuss some troubleshooting tools and strategies that I found invaluable during building and scaling my mining farm operation. This post will cover temperature some management, physical GPU identification, and some light overclocking strategies. I won’t cover GPU bios modding in this post just yet, but may be covering this in a future post.
Thermodynamics 101#
Thermodynamics is the study of heat and temperature as it relates to energy and work. In the mining process, we’re taking in electrical energy and using this to perform work. It’s this work that’s required to power the blockchain consensus model of our blockchain protocol. In the case of Ethereum this is performing the Ethash algorithm at a rapid rate. A byproduct of this work is the generation of heat. Heat is actually lost energy and, to some level, represents energy inefficiency. Additionally, the amount of heat that mining GPUs produce increases as the GPUs effort increases. In a mining model, the effort is measured by hashrate. Performing optimization techniques such as overclocking to increase hashrate will also increase heat unless other techniques are used such as undervolting to reduce power consumption.
As mentioned earlier, custom bios modifications won’t be the topic of this post, but may be covered later. This later post would cover undervolting and more advanced overclocking strategies.
If the heat byproduct is not handled properly, the electronics will actually become less efficient, and prolonged or extreme temperatures may cause component failure and ultimately a burned out GPU.
In order to manage temperature, a number of GPU card manufactures will take the same GPU chips, lay them out on a board design and then attach backplates, specialized heatsinks and fans tasked with extracting this heat through conduction and expelling it away from the electronic components through specially designed fans as an exhaust. Some GPU card manufacturers do a great job at this, and some, not so much. The MSI GPU cards I mentioned in my Part 1: Equipment post are examples of cards that I think are done well of the cards I’ve tested. It doesn’t hurt that they’re pretty cool looking fan, heatsink and LED designs as well!
To give a quick list, here are all the GPUs that I currently run and/or have tested mining both Monero and Ether in no particular order:
- ASUS Dual-Fan Radeon Rx 480 4GB OC Edition AMD Gaming Graphics Card with DP 1.4 HDMI 2.0 (DUAL-RX480-O4G)
- ASUS ROG STRIX Radeon Rx 480 8GB DP 1.4 HDMI 2.0 Polaris Vr Ready Graphics Cards
- MSI GAMING Radeon RX 480 GDDR5 8GB CrossFire VR Ready FinFET DirectX 12 Graphics Card (RX 480 GAMING X 8G)
- MSI GAMING Radeon RX 480 GDDR5 4GB CrossFire VR Ready FinFET DirectX 12 Graphics Card (RX 480 ARMOR 4G OC)
- Sapphire Radeon NITRO Rx 480 4GB GDDR5 Dual HDMI / DVI-D / Dual DP OC w/ backplate (UEFI) PCI-E Graphics Card 11260-13-20G


As I mentioned in another post, I’ve had the best stock-bios mining experience with the MSI GAMING Radeon RX 480 series graphics cards.
Measuring Hot Spots#
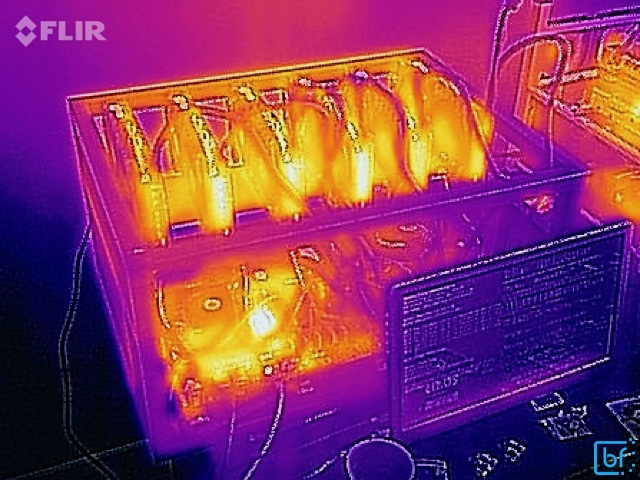
When working with any localized heat-producing product, it really helps to be able to get a visualization of the heat distribution so that as you make modifications, you can compare the temperature distributions. For this, I use a Flir camera. Flir is the leader in thermal camera technology and fortunately, makes this technology available even at the individual consumer level. I have the Flir iOS camera attachment that I use to take images and video and measure hot spots for troubleshooting and thermal management. While a bit of a pricey tool, I highly recommend it! I’ve also used it to identify waterlines behind walls, find leak sources in a ceiling, identify studs behind drywall and track animal traffic.

They also make an attachment for Android and if you want an all-in-one device, they also have you covered with a smartphone-less version

With the Flir iOS camera I was able to measure the effects of certain overclocking, fan-speeds, spacing and how stacking or proximity to other rigs impacts overall temperature. I was even able to use the camera to create a video to identify a failed GPU:
Identifying Physical GPU Positioning#
If you’re using ethOS then you’re probably familiar with the GPU configuration options available via the config file. For instance, a 6-GPU rig individual rig configuration would look something similar to this:
cor abc123 1340 1340 1340 1340 1340 1340
mem abc123 2250 2250 2250 2250 2250 2250
fan abc123 100 100 100 100 100 100
pwr abc123 7 7 7 7 7 7
reb abc123 1
loc abc123 00
miner abc123 sgminer-gm
You’ll notice that I have the core frequency, memory frequency, fan speed, and power config specified for each individual GPU of the rig. It’s applied via the overclocking tools in ethOS by index, separated by spaces. So, if we wanted GPU 5 (in a 0-base index) to have a fan speed of 50%, we would edit that line like so:
fan abc123 100 100 100 100 100 50However, the index is just the index of the PCIe I/O addresses in ascending numerical order. This order is not intuitively related to the physical position in which they’ve been installed in the rig frame or even exactly the order in which the PCIe slots appear on the motherboard. If you’re using a thermal camera, you can take note of the physical location of each GPU by capturing its thermal signature while it’s doing a significantly different amount of work from the other GPUs. This is more feasible if each GPU in the rig is identical.
If you don’t have a thermal camera, or if you prefer another method, you can also simply play with the fan speeds to have the GPUs identify themselves. To do this, you can use the GPU management features of the mining software running. In this case, I’ll show an example using sg-minergm
Bring the mining management screen up:
# show mineryou can then follow the key prompts to manage the GPUs individually. If your tool doesn’t allow you to change the fan speeds directly from the GPU management screen, you can temporarily switch from using a remote.conf to a local.conf by doing the following:
# cp remote.conf remote.conf.bkup
# echo " " > remote.conf
Then you can edit your local.conf and set a GPU index fan speed to 0. Once you do this, go back into the GPU mining management screen and disable the same GPU (this way you don’t have a GPU doing mining while the fan is disabled as it will overheat really fast). The GPUs in the GPU management screen follow the same index scheme as the order of the params in the config file. Once you’ve disabled the GPU from mining, you can go back to your terminal and apply the fan configs:
# ethos-overclockThis will run a script on ethOS that will use the AMD overclocking tools to apply the settings from the config file. If you are running AMD-only GPUs like myself, it will only apply the fan settings and not the memory or core clock settings (which in order to apply, require a reboot). This is fine for the purpose of checking which physical GPU card is on which GPU index because we’re just looking to stop the fan to identify.
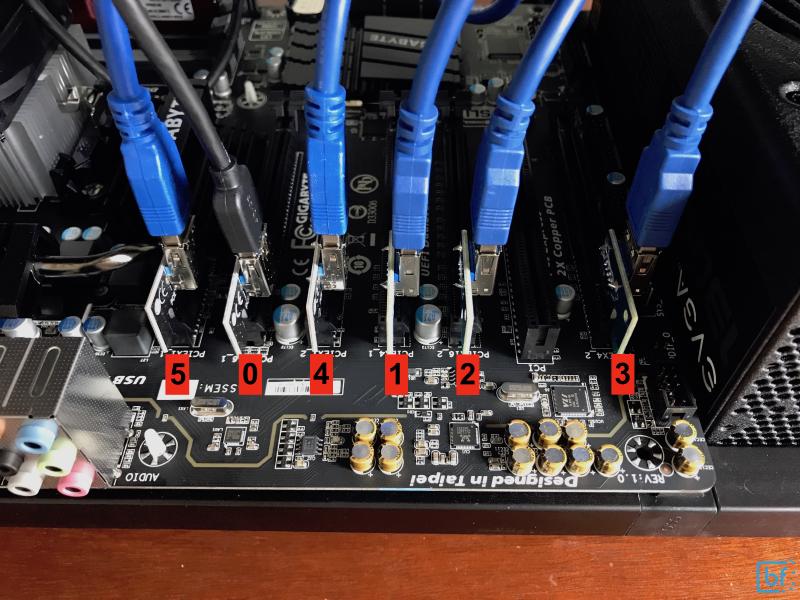
If you’re using the Gigabyte GA-990FXA-UD3 motherboard that I recommended earlier in my builds then you can also just use this reference I’ve created for the slot-to-index mappings. The table below considers the available expansion slots on the motherboard in order from left to right where the left is closest to the CPU (all are 0-based indexes):
| Mobo slot index | GPU ethOS index |
|---|---|
| 0 | 5 |
| 1 | 0 |
| 2 | 4 |
| 3 | 1 |
| 4 | 2 |
| 5 | empty |
| 6 | 3 |
Here is an image with markings for even more clarity: