
If you followed read my last post, you were walked through how to build a node-nginx EC2 instance on RHEL 6. I had initially started with Amazon Linux before writing that post, and then switch to Ubuntu 12.04 and finally to RHEL6.4 only after not having much, off-the-bat success with the first two. This post, I am going to tackle the same thing, but with Amazon Linux and work out the kinks. Why? Because Amazon Linux is cheaper per hour, optomized for running in Amazon’s cloud, has much better Amazon support, AND if you want to do any kind of automated deployments/installations when launching this instance from an AMI, you can use aws-cfn-bootstrap which isn’t terribly well supported on RHEL6.4 (for instance, if you install on RHEL6.4 your likely to run into some interesting issues trying to reconnect to your instance on port 22 later…).
- Start an Amazon Linux EC2 Instance
I won’t go into detail about how to do this, as it’s very similar (in fact, nearly identical except for choosing Amazon Linux as opposed to RHEL 6.4) to step 1 in my previous post.
- Update yum
When I connected to my instance, I noticed a few updates available so I updated them via yum:
$ yum update- Install nginx 1.4.1
As I mentioned in my previous post, Amazon Linux only has an older version of nginx available via yum by default. Because of this, we’re going to have to get the nginx rpm package and build it ourselves.
First, we’ll need rpm-build and rpm-devel as Amazon Linux doesn’t ship with these out of the gate.
# yum -y install rpm-build rpm-develNext, we’re going to get the nginx rpm. I’m going to do this in the /usr/local/src/ directory. Also, you’ll note that the url to the rpm that I’m using is specific to nginx 1.4.1. If you want a different version you can see the package list at http://nginx.org/packages/centos/6/SRPMS/
# cd /usr/local/src/
# wget http://nginx.org/packages/centos/6/SRPMS/nginx-1.4.1-1.el6.ngx.src.rpm
Now, we need to install the dependencies for building nginx
# yum install zlib-devel pcre-devel openssl-devel
# yum install gcc
Use the rpm tool
# rpm -i nginx-1.4.1-1.el6.ngx.src.rpmThen, we’ll actually build nginx
# cd /usr/src/rpm/SPECS
# rpmbuild -bb nginx.spec
Finally, we’ll install via yum the locally built package.
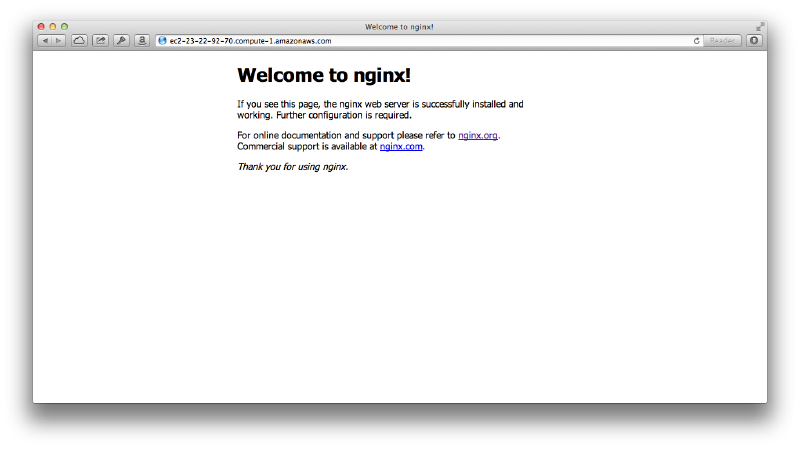
# yum install /usr/src/rpm/RPMS/x86_64/nginx-1.4.1-1.amzn1.ngx.x86_64.rpmYou should now have an /etc/nginx/ directory and you should be able to run $ sudo nginx and see the following page at your instance url (assuming you opened port 80 in your instance’s security group)
- Configuring nginx
See step 5 of my previous post, it’s the same here.
- Installing node
We’re going to install git and download node source and compile it locally. We’re going to checkout the branch for v0.10.13 because at the time of this artical, that’s the current version as noted on nodejs.org. We’ll also need g++ so we’ll install taht as well
# yum install gcc-c++
# yum install git
# git clone https://github.com/joyent/node.git
# cd node/
# git checkout v0.10.13
# ./configure --prefix=/opt/node && make && make install
Now, grab some coffee because this is going to take a while…
Once it’s finished you can add node to your $PATH with the following command
# export PATH=$PATH:/usr/local/bin- Getting node up and running with nginx
See step 7 of my previous post this step is the same.
- Setting up supervisord
This is the same as step 8 in my previous post.
- Baking an AMI
This was something that I meant to cover in my previous post, but didn’t so I’ll cover it here. Although, this is by far the easiest step. In order to create an AMI (Amazon Machine Instance) on AWS you simply right click the instance that you’ve been working on in the EC2 -> Instances list, then click ‘Create Image (EBS AMI)`
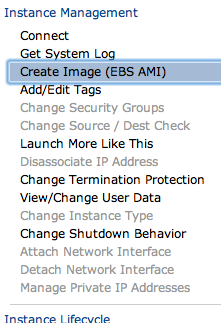
Once you’ve done this the most important (and required) thing you’ll be asked for is a name. After giving a name, click ‘Yes, Create.’
NOTE: make sure you name it something rememberable like node-nginx_YYYY.MM.DD. This will help you when you start making multiple images a day.
You’re AMI will be ready shortly. With an AMI you have the ability to launch exactly where you left off on any different instance size, security group, key-pair, etc you’d like.
Brilliant.